Friday, July 29, 2011

Ripe Mango in coconut and yogurt Mixture / Mampazha pulissery- a sweet and sour curry


This is one of the signature dishes of Kerala. I am sure each and every house in Kerala would have cooked this recipe atleast once. Each of us will have different variations in making this curry. This contains the sweetness of mango, tanginess of yogurt and the spice of chillies. This tastes best when used the next day. This is called as sweet and sour curry because the sourness of yogurt is balanced by the sweetness of mangoes.


You wont believe, I never knew this kind of a dish exist. When my brother returned from Kerala, he mentioned about this dish which he liked a lot, which was made by my grand mom, and my first expression was WHAT !!! How is it possible to make a main course curry with a fruit and that too with sweet mangoes. I only kept wondering how it would have tasted.

In Andhra we dont get these type of mangoes and so this was never cooked at my home. But the next time when I went to kerala for vacation, I insisted on eating this curry which is specially made by my grandmom. It tasted heavenly. A perfect gravy with hot and steaming rice.  This can also be made with big ripe mangoes and also with pineapple. Traditionally, this is made with small ripe mangoes.


Ingredients:
  1. Mangoes- 4nos
  2. Green chillies- 2nos
  3. Coconut (grated)- 1cup
  4. Turmeric powder- ½ tsp
  5. Red chilli powder- ½ tsp
  6. Cumin seeds- ½ tsp
  7. Beaten Curd- 1cup
  8. Mustard seeds- 1tsp
  9. Fenugreek seeds- ½ tsp
  10. Curry leaves- few
  11. Red chillies- 2nos
  12. Shallots (sliced)- 3nos
  13. Oil- 1tbsp
  14. Salt- as per taste
Method:
  1. Wash the whole mangoes and cook them in little water till it becomes soft. When it is done,  peel the skin of mangoes.
  2. Grind the coconut along with cumin seeds and green chillies.
  3. Add this ground coconut paste along with turmeric powder, red chilli powder, salt and water to the cooked mangoes and keep it on low flame for some time.
  4. At last add the curd to the above mixture and stir continuously for a minute and switch off the flame.
  5. Heat oil in a pan and splutter mustard seeds, fenugreek seeds, sliced shallots, red chillies and curry leaves. Pour this tempering over the curry and serve hot with rice.


I am sending this dish to Kerala Kitchen- July 2011 an event hosted by Rose.

Monday, July 25, 2011

Moist and soft Chocolaty Walnut Cake


One evening, when my Husband came back from office, the house was filled with the aroma of a cake which was baking in the oven. He was too delighted to have a piece of the banana almond cake which I usually make for my little one. So he asked me to bake yet another cake using my newly bought cake pan.


However the cake turns, he is usually ok with that. So I simply thought of baking a basic chocolate cake along the similar lines how I usually make the banana almond cake.

Thinking about the chocolate cake,sometime before I read about a moist cake in Raks blog. She is a perfect and a great cook and she has lots of collections in her space.
I made the cake and it turned out really good and my husband even shared the cake with his colleagues. He tells me they all liked it a lot. Not sure.. need to check when I meet them next time :-)


Anyways, I was satisfied the way it came out and I had another cake recipe for my blog.
We like it to be simple so I didn’t do any decorations, but simply kept a jelly rose over the top and sprinkled some chocolate vermicelli which I had used to decorate my black forest cake


Ingredients:
  1. All purpose flour / Maida- 1 ½ cup
  2. Sugar- 1cup
  3. Cocoa powder- 3tbsp
  4. Oil- ¼ cup
  5. Baking Soda- 1tsp
  6. Lemon Juice- 1tbsp
  7. Water- 1cup
  8. Salt- 1pinch
  9. Walnuts (crushed)- ½ cup
  10. Vanilla Essence- ½ tsp

Method:
  1. Sieve the all purpose flour, cocoa powder and baking soda twice atleast to mix evenly.
  2. Mix water and sugar well till the sugar completely dissolves. Add lemon juice, salt, oil and vanilla essence and mix well. In this mixture add the flour mixture and mix until no lumps are formed.
  3. In this add the chopped and crushed walnuts. After mixing the batter will be smooth watery texture.
  4. Preheat the oven to 190 degrees C. By the time grease the cake pan with few drops of oil and flour.
  5. Pour the batter in the pan and bake for about 35 - 40min or until a toothpick inserted comes out clean.
  6. After done, let it cool completely and then cut into pieces and enjoy.


Wednesday, July 20, 2011

Spinach Lentils / Palak Dal - for lazy days

We all know that eating green food is very vital to a healthy diet, and spinach is the king of greens. It is a rich source of iron and rich oxidants that we all need.
This is a very tasty, simple and nutritious dal preparation. Any kind of dal can be used like, moong dal, masoor dal (red lentils) and so on. Here I am preparing this with toor dal. This is one of my favourite comfort food, which is very easy to make. I make this curry almost once in two weeks.. :) This can be served with hot steam rice, roti / chapatis.


Adding garlic to seasoning will get an extra flavor to the dish. This is rich in proteins and nutrients. In general this is served with hot rice, dollops of ghee and avakai (mango pickle), which will awaken your appetite.


Ingredients:
  1. Toor Dal- 1cup
  2. Spinach / Palak- 1cup
  3. Onions- 1no
  4. Green chillies (slitted)- 3nos
  5. Mustard seeds- 1tsp
  6. Turmeric powder- 1tsp
  7. Oil- 1tbsp
  8. Curry leaves- few
  9. Salt- as per taste
  10. Garlic cloves- 3nos
  11. Red chillies- 2nos

Method:
  1. Wash the spinach and cut them into small pieces.
  2. After washing the dal, pressure cook dal, spinach, onions, green chillies and turmeric powder with enough water till 3-4 whistles or till the dal is cooked.
  3. For tempering, heat oil in a pan and splutter mustard seeds. In this add crushed garlic cloves, red chillies and curry leaves.
  4. Add this tempering into the cooked dal mixture and add salt. Cook it on low flame for few minutes.
  5. Serve hot with rice.

Tuesday, July 12, 2011

Roasted Urad Dal (Black Gram) Laddoo / Sunnundalu - beware of calories...

Sunnundalu is a very traditional sweet from Andhra. We get to see these in almost all the special occasions. These are made with black gram, which is very nutritious and protein rich.


This is loved by all. This is ideal for kids as well as pregnant women because of the protein and iron content in them.

From my childhood this has been one of my favorite sweets. Whenever I go to my friends place, they used to give me this sweet since they know that I love them a lot (btw, my mom doesn’t know how to make these laddoos). Without thinking about the calories, I used to eat 2 or 3 laddoos one after the other. Most of the houses in Andhra will have a stock of these laddoos. 


It had been a while since I ate these. Recently I thought of making this for my little one, who is having a sweet tooth, but thinking about the calories, I was a bit hesitant to make it. If I make them I will never stop munching till it gets over. In fact, I will end up eating more than my cutie pie. So I got a solution for that. I made some of these laddoos with ghee and some with oil, however the fat content is there in both but to my satisfaction I made them in oil :)

Roasted and powdered urad dal and powdered sugar can be stored in an air tight container for about 1 to 2 months.  Whenever you want you can mix with melted ghee and make into laddoos.Here is the recipe of my favorite sweet. I hope you all will like this.


Ingredients:
  1. Urad Dal- 2cups
  2. Sugar- 1cup
  3. Ghee / Clarified butter- ½ cup
Method:
  1. Roast the urad dal in a skillet till it turns light brown in colour and leaves the raw smell.
  2. Keep the roasted urad dal aside and let it cool. Grind this to a fine smooth powder using a mixer or a food processor. Make sure that the powder is smooth and super fine. I sifted the powder twice.
  3. Grind the sugar and keep it aside.
  4. Mix the powdered sugar and powdered urad dal in a bowl. Add the melted ghee little by little till you get a consistency where you can shape them in the form of laddoo.
  5. Keep this in air tight containers. Stays fresh for long.


Sending this to Cook it Healthy an event hosted by Shoba shyam, and also to Kids Delight- Mini Bites hosted by Champa. 


Sunday, July 10, 2011

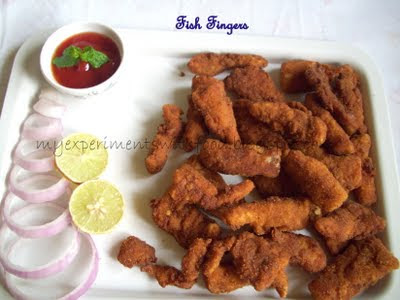
Fish Fingers - you cant stop munching:

This is an excellent snack / appetizer which will be loved by all the non veggies. Fish finger has a crunchy crispiness outside and softness of tender fish inside. They can be baked in the oven, shallow fried, grilled or deep fried. In all the ways they are quite appealing and appetizing.


I have been thinking of making this but I didn’t know what type of fish is used for this. Most of the fish fingers are made with salmon, which we get very rarely.  So I thought of buying a fleshy fish and ended up with black pomfret and the result was scrumptious. My little one couldn’t stop munching till the last. These days I make them regularly as fish (as compared to any other non-veg) is very nutritious and healthy for kids.

In this recipe, the fish is cut into rectangles, marinated with spices, covered in breadcrumbs and fried in oil. Fish fingers can also be used as a filling for burger and sandwiches.


Ingredients:
  1. Fish- 500gms
  2. Ginger garlic paste- 1tbsp
  3. Red chilli powder- 2tsp
  4. Pepper powder- 1tsp
  5. Salt- as required
  6. Lemon juice- 1tbsp
  7. Egg- 1no
  8. Corn flour- ½ cup (for coating)
  9. Bread Crumbs- ½ cup (for coating)
  10. Oil- for deep frying
Method:
  1. Wash and cut the fish into finger shaped pieces.
  2. Combine ginger garlic paste, red chilli powder, pepper powder, Lemon juice and salt in a bowl. Marinate the finger shaped fish in the above mix and let it rest for 30 minutes in the refrigerator.
  3. Meanwhile heat oil in wok for deep frying.
  4. Beat the egg with little salt and keep it aside.
  5. After 30 minutes dip and coat each fish finger in the egg mixture and then roll in the corn flour and bread crumbs well. Deep fry in hot oil till they turn golden brown.
  6. Serve it with tartar sauce or tomato sauce as usual.


Tuesday, July 5, 2011

Steamed Chicken Momos for chicken lovers


Momos / dumplings are  delicious appetizer which is cooked by boiling, steaming, baking as well as frying. In all the ways these are tasty. These can be filled with any minced meat and it can also be made with vegetables.


At first when my cousin bought this and I didn’t like the taste and these were a strict no to me, but one day when my SIL got an idea of making momos with the left over chicken (she is a great fan of these cute dumplings), I was first hesitant to make, but later we both got into the mission and in the first attempt it came out well and then I realised that its so easy to make (we tried it out from a book long back). Now these are my favorite appetizers and when ever we visit a Chinese eatery, I order these first :)

The dough is shaped into small circular flat pieces and after filling is placed, it is enclosed either in a round shape or in the shape of a half moon. I don't know whether the one which I made are called as momos as I shaped them in the form of gujjiya (sorry for that as I couldn’t get the perfect shape), but the taste was the same as the restaurant one :)


Ingredients:
  1. Chicken (boiled and minced)- 250gms
  2. Onions (chopped)- 2nos
  3. Green Chillies (chopped)- 2nos
  4. Ginger and garlic paste- 1tbsp
  5. Soya Sauce- 1tsp
  6. Salt- as per taste
  7. Maida / All purpose flour- 2cups
  8. Oil- 1tbsp

Method:
  1. Combine the maida and salt with sufficient amount of water and knead into a soft dough and keep it aside.
  2. Combine the minced chicken, onions, green chillies, ginger- garlic paste, soya sauce and salt in a bowl.
  3. Divide the dough into small balls and roll out each ball thinly.
  4. Place 1tbsp of the chicken filling in the middle of the rolled out dough and bring all the edges together and pinch and twist the pleats to ensure that the momo is closed tightly.
  5. Steam in a steamer for about 20 minutes.  As I don't have momo steamer I made this in idli steamer.
  6. Serve these with tomato- garlic sauce.


Related Posts Plugin for WordPress, Blogger...