Tuesday, February 28, 2012

Sweet corn Pepper Chat .. colorful temptation ...

From childhood, I loved to eat corn in any form. Even now when ever I see a road side corn wallah, I will make sure I buy the roasted corn and eat it all on my own without sharing even with my daughter :-)


Now there are so many sweet corn stalls in every corner and there are so many varieties of corn dishes we get. Also, the use of sweet corn has been on the rise in the various cuisines. 
This chat is one such recipe, which we ate when we went to a restaurant called Jarokha. This was served as a starter and as soon as I saw the corn I just couldn't stop myself. Even my husband, who is not a big fan of corn, loved this and asked me to try this at home.


The ingredients of the chat was very clearly visible in the plate and I had no trouble identifying the recipe :-)
This corn chat is a feast to the eyes with the lovely color of corn, tomatoes etc. This easy to prepare, a flavorful dish with the lovely combination of corn and veggies is sure to leave your taste buds craving for more.


Ingredients:
  1. Sweet corn kernels- 200gms
  2. Bell peppers (red and green)- 1 each
  3. Onions- 1no
  4. Tomato- 1no
  5. Lemon juice- 3tbsp
  6. Salt- as needed
  7. Pepper powder- ½ tsp
  8. Oil / Butter- 2tbsp
Method:
  1. Wash and chop the onions, bell peppers and tomato. Keep it aside.
  2. Heat oil in a kadai and fry the corn kernels with little salt till it becomes soft.
  3. In a bowl mix all the ingredients, except the lemon juice.
  4. At last while serving add the lemon juice and enjoy a very healthy and nutritious chat.

Wednesday, February 22, 2012

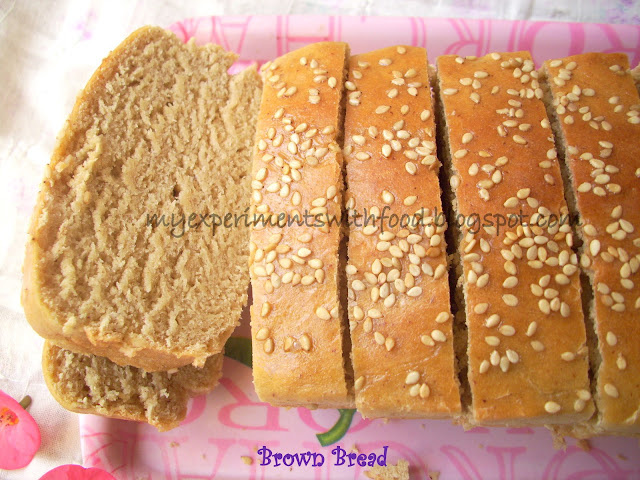
Basic whole wheat bread

In most of the baking recipes(bread), yeast plays an important role. There are 2 types of yeast, Active dried yeast and instant yeast. With instant yeast, no need of proofing, we can directly add this to the flour mixture while making bread. With dried yeast, we need to dissolve in warm water for some time to become active. In the beginning there will be quite some chaos with using the right yeast in right quantities. I use dry yeast and for me yeast is quite a familiar ingredient since past few years. Thanks to my frequent endeavours with Appam :-) 


Now a days we prefer to eat whole wheat bread / brown bread as it contains loads of fibre when compared to white bread. Fibre-rich food is known to prevent heart diseases, cancer and so on.


While buying the brown bread from market, you need to check the ingredients because in most of the brown breads they add colour ( caramel colouring, brown colour) with which the brown colour comes and we take it as wheat bread. We have to ask for the whole wheat bread.


Coming to the recipe, I was really scared of making bread because of the yeast. I took courage and made it and you can see the end result.

Ingredients
  1. Whole wheat flour - 2 cups + 1tbsp
  2. Milk - 1/2 cup
  3. Sugar- 1 tbps
  4. Salt - a pinch
  5. Yeast-2 tsp
  6. Warm water - 1/2 cup
  7. Olive oil / Vegetable oil-1 tbps + 1 tbsp
  8. Sesame Seeds- 1tbsp
Method:
  1. Soak the yeast and sugar in ½ cup of warm water and let it rest for some time till the water turns frothy.
  2. Mix the flour, salt, oil, milk and yeast mixture together in a bowl. Knead well with the heel of your hand till it forms a sticky dough. Repeat the process several times and leave it covered with a cling film or a damp cloth for about 45 minutes.
  3. After that, the dough will rise double in size. Punch the dough to release the air and knead well for 2- 3 minutes on a floured surface till it attains its original size.
  4. Grease the bread pan with 1 tbsp oil and 1 tbsp flour and place the kneaded dough into the pan and let it rest for another 20 minutes.
  5. Pre heat the oven to 180 degrees C. Brush the surface of the kneaded dough with butter or egg white and press the roasted sesame seeds on top of the dough.
  6. Keep this in pre heated oven and bake for about 30 minutes or till golden brown and well cooked.
  7. Once the bread is done, take it out of the oven and brush the top of the bread with little butter or oil for softer crust.
  8. Let it cool for 5 minutes and rest it on a wire rack. When it is cooled completely slice it and enjoy your way.


Thursday, February 16, 2012

Peanut Choco Rocks


Last week our house was getting repainted and I was not too much into cooking. Recently my brother bought me loads of dark and white cooking chocolates and along with the house painting, I thought of preparing some easy stuff with those chocolates, before the kitchen got messier with the painting work.


I was in search of chocolate recipes and I stumbled upon this really simple and easy preparation. This can be prepared with just 2 ingredients that are very common and handy. Even a small kid can make this with the help of an adult to melt the chocolate.


In the original recipe which I saw, the chef adds all kinds of nuts. But as I am very fond of peanuts, I added only those. In general I love adding peanuts in certain desserts like the hot chocolate fudge (which is my most favorite ice cream).


This preparation is ideal for a gift. Taking a bite into the melted chocolate along with the crunchiness of peanuts is just amazing.
Ingredients:
  1. Dark Chocolate- 250gms
  2. White chocolate- 250gms
  3. Peanuts- 3cups (1 ½ cups for each chocolate)
Method:
  1. Roast the peanuts in a skillet, remove the skin when cooled and keep it aside.
  2. Melt the dark chocolate in a double boiler. when it is fully melted add the roasted peanuts and mix well till all the peanuts are coated with chocolate.
  3. On a parchment paper, drop one scoop of the peanut- chocolate mixture. Repeat till mixture gets finished.
  4. Keep this in refrigerator for 4- 5 hours or till it is well set.
  5. Repeat the same above process for the white chocolate and enjoy the choco rocks when needed.


Note:
  • We can add any type of nuts like the almonds, walnuts, cashews and so on. We can also use marsh mellows instead of nuts.


Wednesday, February 8, 2012

Basbousa- An Arabian dessert


I never knew that something like basbousa ever existed till I saw cookery show in TV and I liked the end result (the cake after coming out of the oven), but as I didn’t see the show from start, I didn’t know what are the ingredients which went into this delicious dessert. The next moment I googled and got so many recipes for this.


Basbousa is an Egyptian dessert which can be made without any effort and with less ingredients. The main ingredient is semolina. Adding of sugar syrup will induce the cake to be soft and full of flavors. Lemon juice is added so that it will prevent the sugar from crystallizing. 


This is found in eastern Mediterranean cuisines under different varieties of names. This is such a rich cake, very moist and exceptional too.


Adapted from Arabic Food:
Ingredients:
  1. Semolina- 2cups
  2. Sugar- 1cup
  3. Coconut flakes- 1cup
  4. Butter- ½ cup
  5. Milk- 1cup
  6. Yogurt- ½ tbsp
  7. Slivered Almonds- ½ cup
Sugar Syrup:
  1. Sugar- ½ cup
  2. Water- ½ cup
  3. Butter- 1tbsp
  4. Lemon juice- 1tbsp
  5. Rose essence- 2-3 drops
Method:
  1. Place the sugar, water, rose essence, butter and lemon juice and let it boil for 5- 8 minutes till the sugar gets dissolved. Allow it to cool.
  2. In a bowl, mix sugar, coconut flakes and semolina well.
  3. Boil the milk and butter in a vessel and keep it aside.
  4. Add the semolina mixture and yogurt. Mix well till everything is blended well.
  5. Grease a baking tray and pour the above mixture into the tray and spread it with the back of a spoon evenly.
  6. Bake for about 30 - 35 minutes in a preheated oven of 180degrees C or until it turns golden brown.
  7. When it is done, remove from oven and distribute the roasted almonds  on top of the basboussa at equal distances, so that when you cut into pieces each piece has an almond topping in the centre.
  8. Keep this for about 10- 15 minutes and slowly pour the cooled sugar syrup over the hot cake. Let the cake soak the syrup and let it completely cool.
  9. Cut this into diamond or a desired shape and serve.

I am sending this to Valentine’s day event.

Saturday, February 4, 2012

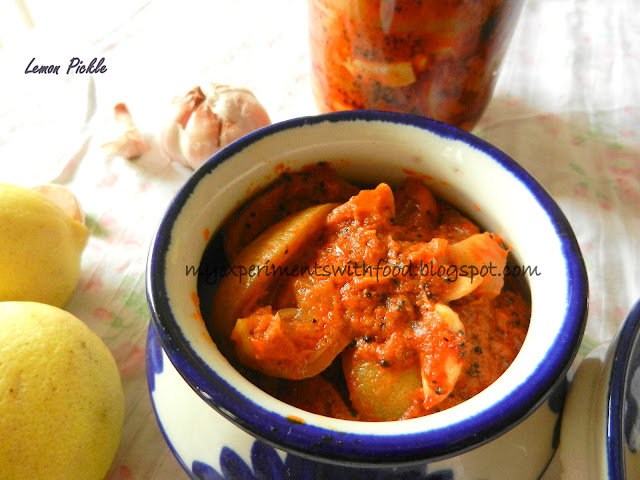
Lemon Pickle / Naranga Achar- A tangy delight...

After a short trip to Kerala, I am back with a spicy, tangy recipe which is my favorite one. This is the first time I tried making pickle on my own. Pickles are an inevitable part of our meal. I used to think that I could never make a pickle as they will get damaged soon, till I tried this.
My friend gave me lemon and I was in a dilemma on what to do with these many lemon and then I thought of pickling them.


I took the courage and with the help of my mom and a bit of googling I made this yummy pickle, which I am sure will be loved by all. This is actually a combination of Andhra and Kerala style recipes. 


Salted Lemon
This can be stored for months in air tight jars without any damage. It is best served with rice and curd. My Husband likes to have this pickle along with biryani.... :)


Now I am confident about preparing pickles and I will try to come up with more such recipes. But I can never beat the famous fish pickle made by Mom and the prawns pickle made by my M-I-L, with all their love and effort.


Ingredients:
  1. Lemon- 12nos
  2. Salt- 2tbsp
  3. Garlic- 10- 15 cloves
  4. Ginger (chopped)- 2tbsp
  5. Curry Leaves- a handful
  6. Dried red chillies- 4-5 nos
  7. Red chiili powder- 3tbsp (big)
  8. Turmeric powder- ½ tsp
  9. Gingelly oil- 3-4 tbsp
  10. Asafoetida Powder- ½ tsp
  11. Fenugreek- ½ tsp
  12. Mustard seeds- 1tsp


To Roast:
  1. Mustard seeds- 2tsp
  2. Fenugreek seeds- 1tsp
Method:
  1. Wash, wipe and cut each lemon into 4 pieces. Put these lemon pieces in a clean jar and add salt. Mix well, close the jar tightly and keep it for 10- 15 days. In the meanwhile shake the bottle containing lemon pieces once daily, so that everything gets mixed well.
  2. Roast and grind the fenugreek and mustard seeds and keep it aside.
  3. On the day of making the pickle, heat oil in a pan, splutter mustard seeds, fenugreek seeds.
  4. In this add garlic, ginger, slitted green chillies, dried red chillies and curry leaves, saute for a couple of minutes.
  5. Take it off the stove and add the red chilli powder, turmeric powder, roasted powders and asafoetida powder. Mix well.
  6. Add the lemon pieces and add salt if needed. Put this on low flame and mix for about 2-3 minutes. Keep it aside to cool.
  7. Transfer that to a clean air tight jar and can be used as needed.


Note:
  • Before making the pickle, we can drain the water that comes out of the salted lemon, it helps to reduce the sourness.
  • At last we can also add vinegar.
Related Posts Plugin for WordPress, Blogger...