Tuesday, November 28, 2017

Oats Lace Cookies


Who wouldn’t like a crispy, lacy, scrumptious cookies? These oats lace cookies are one of our favorite cookies which will get over within minutes of baking. These thin, crispy oatmeal cookies will be the star among all the other delicacies in parties.


Just melt the butter and sugar, then once cooled add all the other ingredients and bake for less than 10 minutes. Simple and easy cookies can be made within no time and with very fewer ingredients.


The cookies, while baking, will spread so bake them in batches. This quantity will make about a whole lot of cookies, which can be gifted to friends and also can be enjoyed on cold evenings. Just try this one and I guarantee that you just cannot stop on one as they are buttery and so addictive.


Ingredients:
  1. Rolled oats- 1 ½ Cups
  2. Sugar- 1 Cup
  3. All-Purpose Flour- 2 tbsp
  4. Butter- ½ Cup
  5. Vanilla Essence- 1 tsp
  6. Eggs- 1 no
Method:

  1. Preheat the oven to 350 degrees F
  2. Heat butter and sugar in a saucepan over medium heat. Stirring frequently until the butter and sugar have melted and the mixture is smooth. Stir in the flour and mix well.
  3. Remove the pan from heat and drop in the vanilla essence and let it cool for 10 minutes.
  4. When the mixture is warm, add the egg and stir till it combines. Drop the oats stir until well distributed.
  5. Spoon 1 tbsp of the batter on to the parchment paper, leaving about some space between each one.
  6. Spread using the back of a spoon into a single layer. Bake for about 6-8 minutes, watching closely from over baking. They will turn golden brown. Bake the cookies in batches as they spread.
  7. Remove from the oven and let the cookies cool on the parchment paper. Store in airtight container when cool.


Thursday, November 9, 2017

Fish Biryani- An exquisite dish to celebrate the 8th blogiversary...


Happy to announce my blog's 8th anniversary
A classic fish biryani which can be devoured at all times. Fish biryani is a perfect combination of the spices, rice along with marinated fried fish. Rather than weekdays, I prefer weekends for preparing elaborate meals like the biryani, which everyone in the house can enjoy comfortably. Usually, I will be making chicken or mutton biryani, this is the first time I tried preparing fish biryani. I tasted the fish biriyani first when I visited my brother’s place. My SIL who is a great cook prepared this within no time and instantly I fell in love with this biryani but I never dared to make biryani at home. I have had a few disasters at first like the rice was undercooked or overcooked! But now I have perfected the art of making biryani and there is nothing like a good home cooked version.


Once I started making biryanis, I prepared this fish biryani and everyone in my house liked it.
We can use sear fish, or any fish fillet to prepare this biryani. This is easy to make and an extremely flavorful dish and will be loved by all seafood lovers.
This time for the MFB Challenge, we can prepare a dish which we repeated before as this month is the anniversary month of MFB Challenge. We started this MFB Challenge exactly a year ago. I choose this fish biryani for the anniversary special and also to celebrate my blog's 8th birthday. It's been 8 years since I started my little space and today I have more than 500 recipes and a lot of friends all over the world. Thank you, one and all for the wonderful encouragement.


Ingredients:
For Biryani Masala:
  1. Cardamom pods- 3 nos
  2. Cinnamon - 1 Stick
  3. Cloves- 3 nos
  4. Nutmeg Powder- ¼ tsp
  5. Fennel Seeds- 1 tsp
Method:
  • Roast the ingredients for the masala. When a nice aroma comes switch off the flame and when cooled grind to a fine powder.
For the Marinade:
  1. King Fish Slices- 6-8 nos
  2. Turmeric Powder- 2 Tsp
  3. Red Chilli Powder- 2 tbsp
  4. Pepper powder- 1 tbsp
  5. Ginger- Garlic Paste- 1 tbsp
  6. Lemon juice- 2 tbsp
  7. Salt- as required
  8. Oil- 2 tbsp
Method:
  1. Heat oil. Meanwhile mix together all the ingredients in marinade except fish. Marinate the fish and set aside.
  2. When the oil becomes hot, fry the marinated fish till it gets cooked and drain on a kitchen towel.
For the Masala:
  1. Onions( Sliced)- 3 nos
  2. Slited Green chilies- 4 nos
  3. Tomatoes(sliced)- 2 nos
  4. Ginger- garlic paste- 1 tbsp
  5. Curd- 1 Cup
  6. Coriander and Mint Leaves- a handful
  7. Red Chilli powder- 1tsp
  8. Turmeric Powder- ½ tsp
  9. Biryani Masala- 2 tbsp
  10. Lemon Juice- 2 tbsp
  11. Oil- 1 tbsp
  12. Ghee- 1 tbsp
Method for biryani masala:
  1. Heat the fried fish oil and ghee in a pan. Add the sliced onions, fry till it turns golden brown in color. Add the slitted green chilies and ginger- garlic paste.
  2. When the raw smell disappears, add the sliced tomatoes, lemon juice and stir till it turns mushy.
  3. Add the red chili powder, turmeric powder, and the above-made biryani masala powder.
  4. Throw the chopped mint and coriander leaves in the above masala. Add the curd and mix till everything gets well blended with the ingredients. Cook till the mixture thickens. Keep this aside.
For the Rice:
  1. Small Jeera Rice- 3 Cups
  2. Bay leaves- 1 no
  3. Cloves- 2 nos
  4. Cinnamon- a small stick
  5. Cardamom- 2 nos
  6. Clarified Butter- 1 tbsp
  7. Oil- 1 tbsp
  8. Water- 6 Cups
  9. Salt- as required
Method for rice:
  1. Wash and soak the jeera rice for about half an hour. Drain and keep this aside.
  2. Heat oil and ghee in a deep bottomed vessel. Add the cloves, bay leaf, cinnamon stick, and cardamom.
  3. Add water and enough amount of salt, on a low flame close with a lid. When the water starts boiling add the drained rice and stir well.
  4. Close with a lid and let it cook on a low flame for exactly about 20 minutes. Switch off the flame and let it sit for about 10 minutes.
  5. Open the lid and fluff it up using a fork. Keep this aside.
For layering:

  1. Spread half of the cooked rice and sprinkle the chopped coriander leaves and spread a half tbsp of ghee on top.
  2. Spread the biryani masala gravy and layer the fried fish. Repeat with the cooked rice, chopped coriander leaves, ghee, biryani masala gravy and at last with the fried fish and the last layer it with rice.
  3. Seal the top with a wet cloth and a lid. Place this on a tawa over a low flame for about 10- 15 minutes so that all the masala flavors will be incorporated well into the rice.
  4. Switch off the flame and serve this delicious biryani along with raita.


Monday, November 6, 2017

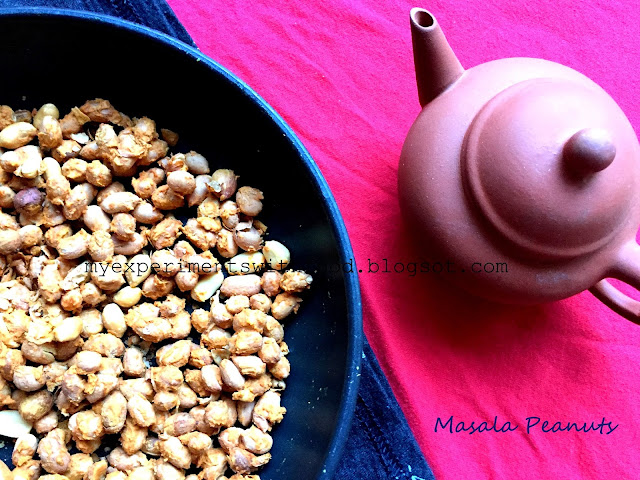
Baked Masala Peanuts


Masala peanuts is a perfect tea time snack which will be enjoyed by all in the family. Baked masala peanuts are one of our favorite snacks and so I will make sure to refill this by preparing a big batch before it gets finished. This is a guilt-free version of the fried masala peanuts and can be enjoyed an extra handful.


The masala peanuts are coated with a thick batter of gram flour and seasoned with spices, which is then baked to perfection and enjoyed by all. Make sure to stir in between or else they will burn and will not taste good. The baked ones are crispy, crunchy and tasty just like the fried ones. By adding garlic, the flavor is well incorporated. This is so easy to make that you just have to throw all the ingredients in a mixing bowl and bake in the oven till done. This is a perfect guilt-free snack which can be enjoyed any time of the day. Hope you all may like this.


Ingredients:
  1. Peanuts- 2 Cups
  2. Besan/ Chickpea Flour- ½  Cup
  3. Rice Flour- 3 tbsp
  4. Red Chilli Powder- 2 Tsp
  5. Salt- as required
  6. Ajwain- 1 tbsp
  7. Garlic- 3 cloves
Method

  1. Preheat the oven to 350 degrees F and line a baking tray using parchment paper.
  2. Wash and drain the peanuts. Keep this aside. Crush the garlic just once.
  3. Add all the other ingredients in the drained peanuts and mix well till everything gets well incorporated.
  4. Spread this evenly onto the lined baking tray, make sure that there are no lumps and breaking the lumps with fingers.
  5. Bake for about 15 minutes, stirring in between. Switch off the oven and allow it to cool by keeping it outside the oven.
  6. The peanuts will turn even more crispy and crunchy. Store it in an airtight jar and enjoy.


Related Posts Plugin for WordPress, Blogger...