Thursday, December 27, 2012

Banana Loaf cake

This time again it is a cake recipe. I made this so many times, but this is the first time I am posting this recipe coz this time I managed to take photos before it got over :-).


This is one of my favorites, as I like the unique banana flavor and the soft texture. The ripe bananas are mashed and added in the batter and when it is done, it is cut into slices. This cake is best served warm with a slight spread of butter. In this cake, we can add any of the nuts we want. This is a perfect tea time cake and kids will also love this to have them after coming back from school.


Ingredients:

  1. Butter- ½ cup
  2. Sugar- ¾ cup
  3. Vanilla Essence- 1tsp
  4. Egg-1no
  5. Bananas- 2 nos
  6. All purpose flour / Maida- 1 ½ cup
  7. Milk- ¼ cup
Method:
  1. Mix the butter and sugar well in a bowl till it becomes creamy and pale in colour. In this add the vanilla essence and egg and mix well.
  2. Mash the bananas and add them in the above mixture and mix well with a spoon without any lumps.
  3. Add the all purpose flour and milk alternately till everything is well incorporated.
  4. Meanwhile preheat the oven to 180 degrees C. Pour the prepared batter in a greased loaf pan and bake for about 40 min or till an inserted toothpick comes out clean.
  5. When it is done cool on a wire rack and decorate on top as required.


I am sending this to Bake Fest


Saturday, December 22, 2012

Eggless Vanilla Cupcakes - Christmas baking....

I hope all of you are busy baking goodies for Christmas and going for vacations and so on. For me the baking bug has bitten me yet again and so there are some cakes and cupcakes coming out of my oven. Some are successful and some with cracks ..:(


The cracks in the sense, in the starting days of baking , i.e when I learnt baking, I had a passion to bake more and more goodies and so the cookies, cakes and cupcakes, whatever I made came out well (as you all can see in my previous posts). but now- a-days, whenever I am trying to bake something, either it would be half baked and raw or I can see big big cracks on them, which is not at all a pleasing sight.


So my little one insisted me to make cupcakes for her and as she will be very happy even with my cracked cupcakes and so I made her these egg less cupcakes and to my surprise, they came out perfect (without any cracks ). I was really surprised how these turned out perfect. This is the recipe I used ...

Ingredients:
Adapted from cookingandme:

  1. All purpose flour / Maida- 1 ½ Cups
  2. Thick Curd- 1 Cup
  3. Sugar- ¾ Cup
  4. Baking powder- 1 ¼ tsp
  5. Baking Soda- ¼ tsp
  6. Vanilla Essence- 1 tsp
  7. Oil- ½ Cup
Method:
  1. Mix sugar and curd well till the sugar is well dissolved.
  2. In this add baking powder, baking soda, vanilla essence and oil. Stir well.
  3. Add the flour slowly and gently fold the mixture, without over mixing the batter.
  4. Meanwhile preheat the oven to 180 degrees C and pour the above batter in the cupcake liners and bake for about 15- 20 min or till a toothpick inserted comes out clean.
  5. When it is done cool them on wire rack and decorate as needed or serve them as it is.


I am sending this to cookcookandcook and also to spicyfood events.


Wednesday, December 12, 2012

Peanut Butter Cookies

You all might be wondering where this girl has disappeared from the blogging world. Actually these days I am really really busy with my school work, regular home stuff, running after my little one and to add to it, I also started hitting the gym due to very heavy coercing from my husband. But the idea of going to a gym is not at all bad as it is a real stress buster. Forgetting all the tension of work, I will be in another world.


Ok now coming to my today’s recipe, its about cookies. The other day when I was cleaning my pantry, I got a big bottle of peanut butter which was idling. We bought that for my little one but she is more interested in nutella. So I thought of trying out cookies from that peanut butter and I remembered the recipe which I had come across in “Laura in the kitchen”. The end result is as you all can see.


Ingredients:
Adapted from Laura in the Kitchen:

  1. All purpose flour / maida- 1 ½ cups
  2. Baking Soda- ½ tsp
  3. Salt- a pinch
  4. Butter- ½ Cup
  5. Sugar- 1cup
  6. Egg- 1no
  7. Vanilla extract- 1tsp
  8. Peanut Butter- ¾ cup
Method:
  1. Cream together the butter and sugar till it turns out to be creamy and fluffy. In this add the egg and continue to mix till combined.
  2. In this add the peanut butter and the vanilla extract and mix well.
  3. Add the dry ingredients one by one i.e all purpose flour, baking soda and salt. Mix well till everything is well combined.
  4. Scoop it on a baking tray and flatten the cookies using your fingers or the back of a spoon. Decorate it as you want and bake in a preheated oven of 170 degrees C for about 15- 20 minutes or till golden around the edges.
  5. When it is done transfer it on a wire rack and cool completely.


Monday, November 19, 2012

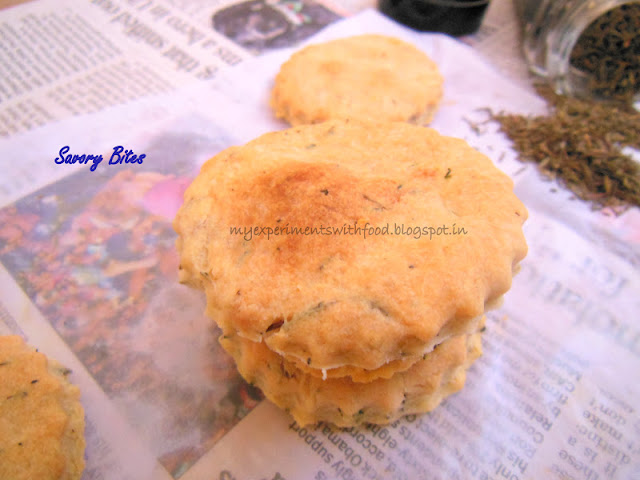
Savory Bites

My kid is a huge fan of Cbeebies channel. She already knows each and every programme and at what time it comes. One after the other she tells about  each and every programme. Like that one day when I was giving her lunch, I saw the programme called “ I can Cook”. In that, you all might know, kids will be cooking easy dishes and my kid loves this programme a lot. I saw this dish which was very easy to make and looks very cute. My little one was asking me how it will taste and all. So I thought of giving it a try and made it with the help of my kid.


These savory bites are so delicious and are very easy to make. Addition of butter, cheese and milk will make this more healthy and nutritious for kids. The herb used in this is dried thyme, which gives a unique taste and a scintillating aroma to the dish. We can sprinkle some sesame seeds on top while baking, but I like it this way - plain and simple.


Ingredients:

  1. All Purpose Flour / Maida- 100 gms
  2. Butter- 25gms
  3. Milk- 4 tbsp
  4. Cheese- 4 tbsp
  5. Dried Thyme- 2 tbsp
Method:
  1. Mix the flour and butter with your fingers, till the mixture looks crumbly.
  2. In this add the dried thyme and grated cheese, mix well.
  3. Pour milk in the above mixture and knead it well till it becomes a soft ball. (If the dough looks dry we can add little more milk).
  4. With the help of a rolling pin roll out the dough like a chapati but little thick.
  5. Using any shape cutter, cut out shapes and place them on a baking tray.
  6. Preheat the oven to 190 Degrees C and bake it for about 10 - 15 minutes or till golden on top.
  7. Serve them when they are cooled.


Tuesday, November 13, 2012

Badam Burfi / Chocolate Burfi (Chocolate Fudge)- Time to celebrate

Its time to celebrate. It is my blog’s 2nd anniversary and also Diwali. I cannot believe that its been 2 years that I started my small space. Thank you all for your support and encouragement.

The diya was made by my little one at school
Coming to the festival  Diwali, the festival of lights is here and everyone is busy buying crackers, diyas and most importantly sweets. Almost all the sweet stalls are filled with people buying sweets for friends and family.


Since I grew up in Andhra, I enjoy the colours of diwali, lights, crackers and so on. Now as all are busy making sweets, I thought of making some for my little one as she is very fond of sweets and if the sweets are homemade, that will be very natural and healthy.

I have made two varieties of burfis. One is almond and the other one is chocolate burfi. I only had plan of making almond burfi, but as I was going through my old cookery book, I came across this chocolate fudge which is very easy to make and can be made within minutes with few ingredients.


I love cooking and mostly baking. But when it comes to making sweets, I am a bit behind. My Mom used to make Kerala cuisine, but she used to try and make whatever we asked for. After I came back from school, she used to give me surprises by preparing all these. So I tried these and both the burfis came out quite well.

For badam burfi:
Ingredients:

  1. Almonds- 1Cup
  2. Sugar- ¾ Cup
  3. Milk- ¼ Cup
  4. Cardamom Powder- ½ tsp
Method:
  1. Soak almonds in hot water for about 20- 30 min. Peel the skin and grind it to a fine paste by adding required amount of milk and keep it aside.
  2. Add sugar and grind it along with almonds.
  3. Heat a nonstick pan and pour the almond mixture and stir well till it separates from the sides of the pan. In this add the cardamom powder and mix well.
  4. Pour this in a greased pan and smoothen the surface with a spoon. Keep this aside till it sets well. Cut them into squares and serve.
Chocolate Burfi:
Ingredients:
  1. Milkmade / Condensed milk- 200gms
  2. Butter- ¼ Cup
  3. Cocoa Powder- 3tbsp
Method:
  1. Mix the condensed milk and butter without any lumps and heat it in a pan for about 10 -15 min or till it becomes brown in colour.
  2. Add the cocoa powder and mix well.
  3. Pour this in a greased pan and keep this aside to set. Cut it into squares.


Wednesday, November 7, 2012

Leftover Upma Cutlet

On some days, I will be left out with more breakfast. How much ever we try to finish it off little bit will be remaining. Like this upma was left out as I made a lot and we are not big  fans of upma ;-). So instead of wasting the left over upma, I wanted to try something different and thought of making a snack out of it, so that my little one can munch them.


Before this I never saw or tasted a cutlet with upma. But when I searched around, I stumbled upon these pretty looking cutlets from Shanthi’s blog 7aum suvai. I tried these cutlets and they were extremely tasty and a perfect evening snack. I didn’t add vegetables while preparing upma, I added them while preparing cutlets and shallow fried these using very little oil. A yummy and tasty snack was ready within minutes.


If anyone gets bored of eating leftover upma or feel guilty about wasting it, they you can try this and enjoy :-)

Ingredients:

  1. Leftover Upma- 1 cup
  2. Carrot (diced)- 1 no
  3. Beans (chopped)- 4 nos
  4. Corn flour- 1/4 cup
  5. Bread crumbs- 1/4 cup
  6. Salt- as per taste
Method:
  1. Boil the carrot and beans with little salt and add to the left over upma and mix well. ( if you add vegetables while making the upma, then skip this step).
  2. Make small balls out of the upma and flat it on your palm. Keep this aside.
  3. Mix corn flour with little water and keep this batter aside. In another bowl take bread crumbs.
  4. Dip the above shaped upma first in the corn flour batter and then in the breadcrumbs and shallow fry them till it becomes golden brown on both the sides.


Tuesday, October 30, 2012

Seviya / Sweet Vermicelli

                                         Eid Mubarak to all my dear friends

Eid is a time of celebration. We use this opportunity to meet all our relatives and friends and share our joy and happiness. 


Food plays an important role in all these reunions and no feast is complete without a dessert  and that too if it is a festival then it is sort of a compulsion to have sweet to celebrate. Each and every family will have their own version of traditional recipes and in that, sweet is a must.

I have tasted this dessert, whiIe I was in Andhra and my neighbours used to give this often. Then my mom learnt this and made this for me. I usually make different varieties of payasams or kheer for Eid. But this time I thought of this and tried with the help of my mom and the result was, a perfect and yummy dessert within minutes.


In this recipe, the vermicelli is roasted in clarified butter and then cooked in sugar syrup till soft and smooth. If we want we can add khoya which will increase the flavor. This dessert is generally made with thin vermicelli, but as my husband doesn’t like thin variety, I made this with bambino. This is dry Seviya and can be stored for many days. We can also serve this with cream.

Ingredients:

  1. Vermicelli- 2 cups
  2. Sugar- ¾ cup
  3. Ghee / Clarified Butter- 3 tbsp
  4. Water- 1 ½ cups
  5. Mixed Nuts (cashews, almonds and pistachios)- ½ Cup
  6. Saffron / Food colour- 1 pinch
  7. Cardamom powder- 1tsp
Method:
  1. Heat ghee in a pan and roast the vermicelli till the raw smell disappears or till it turns golden brown in colour.
  2. In another bowl add water and sugar and boil  till the sugar dissolves well. In this add the orange food colour and cardamom powder.
  3. Add this sugar syrup in the roasted vermicelli. Lower the flame and cook till the vermicelli becomes soft and water is completely absorbed.
  4. Mix well till the moisture from the vermicelli is evaporated and it becomes dry.
  5. Garnish with all the nuts and serve hot or cold.


Friday, October 12, 2012

No bake Lemon Pie

I love visiting Laura’s blog as there are so many different varieties and so many new dishes which are very easy to make and the way she explains each and every dish is amazing to watch. 


Once as I was searching for some other recipe, I accidentally found this and at that time I had all the ingredients which was required to make this dish with me. So thought of giving it a try, not in a tart pan but in small dessert glasses and I know that the glass which I used was not so small but we can make this in small glasses and it looks good when served in glasses.
Believe me, this tastes so delicious. With the sweet and the tangy flavour, we will end up having at least two to three glasses. This is a perfect dish for any occasion and also a different dish to try.


As shown in the original recipe we can make this in tart pan and cut it in slices and serve it, but I like it this way as we can see the layers. To fill the glass, I layered first with biscuit crumbs, condensed milk mixture, whipping cream. Then again I repeated the layers and on top of the whipping cream I decorated with small jellies. I hope you all will try and like this dish.
Ingredients:
Adapted From Laura in the kitchen

  1. Graham Cracker Crumbs / Marie Biscuits- 1 Packet
  2. Butter- ½ cup
  3. Granulated Sugar- ¼ cup
  4. Condensed Milk- 1 can
  5. Lemon Juice- ½ cup
  6. Lemon Zest- 1
  7. Whipping Cream- 1 cup
Method:
  1. Powder the marie biscuits to powder and mix this along with required amount of butter in a bowl till it resembles the texture of sand.
  2. Press this mixture in serving glasses and keep this aside.
  3. Mix sugar, condensed milk, lemon juice and lemon zest well. Pour this over the prepared crust.
  4. Whip the cream and spread this evenly over the top of the mixture and refrigerate this for atleast 2- 3 hrs before serving and decorate as required and serve.


Tuesday, October 2, 2012

Spicy Baby Potato fry

This is a very easy, simple and delicious side dish, which goes well with steaming rice. Usually we will be preparing this with regular potatoes, but with baby potatoes this looks cute and tasty too.


Believe me, you will ending up licking the bowl. This will be so tasty and it will be a hot favorite among kids.  I have added a touch of sambar powder as this will increase the taste and this I learnt from my S-I-L. Whenever she goes to her house, she used to bring homemade sambar powder and she used to add it in all the fries and it tasted heavenly.


This has become a regular dish at my house, that my kid always wants this along with rice. This is very healthy and nutritious and is worth a try.

Ingredients:

  1. Baby Potatoes- 10- 15 nos
  2. Red chilli powder- 1 tsp
  3. Turmeric powder- ½ tsp
  4. Cumin powder- ½ tsp
  5. Sambar powder- ½ tsp
  6. Onions- 1 no
  7. Green chillies (slit)- 2 nos
  8. Mustard seeds- 1 tsp
  9. Urad dal- 1 tsp
  10. Oil- 1 tbsp
Method:
  1. Wash and pressure cook the baby potatoes for until 2 whistles. It should be cooked well and should be soft, but not mushy. Peel the skin and keep it aside.
  2. Heat oil in a pan add the mustard seeds and urad dal. When it splutters add the sliced onions and green chillies.
  3. Add the peeled potatoes, red chilli powder, turmeric powder, cumin powder, sambar powder and salt.
  4. Stir well till all the potatoes are mixed with the spice powders and cook for another 2-3 minutes or till the potatoes get well roasted.
  5. Serve it with hot steaming rice.


Wednesday, September 19, 2012

Badam Halwa- an Indian dessert

This halwa brings back memories of my childhood days which I spent in Andhra, whenever I visited my friends house on any occasion, this halwa was always the main attraction. This is a common sweet in almost all the households, which is made with loads and loads of ghee.


In this recipe, the almonds are soaked in water and then ground to a fine paste. Some will grind it coarsely to get the nutty feeling while eating the halwa, but I like it this way. This paste is added in the sugar syrup and mixed till it turns thick. We can shape it in whichever way we want. We find this mostly in the shape of diamond.


So since I saw quite a bit of almonds lying in my pantry, the first thing that clicked to me was this recipe and so I referred to some sites and got an idea of how to make it and started the process and result is before you. Do try this special, rich dessert for any occasion. I am sure that all will love this.


Ingredients:

  1. Badam / Almonds- 1 cup
  2. Sugar- 1 Cup
  3. Water- 1cup
  4. Ghee / Clarified Butter- ½  cup
  5. Yellow food colour- a pinch
  6. Cardamom powder- 1tsp
Method:
  1. Soak the almonds in water for few hours and peel off the skin. Grind it to a fine paste and keep this aside.
  2. Take a thick bottomed pan or a non stick kadai. Add sugar and water and  let the water boil and the sugar should dissolve well.
  3. Lower the flame and add the badam paste, mix well to avoid lumps. Add the yellow food colour and cardamom powder and stir it well for some more minutes.
  4. Add ghee in regular intervals and keep stirring until the halwa starts to leave the sides of the pan.
  5. Slowly the halwa stops sticking to the kadai, stir well. At this point remove from fire and pour it into greased plate and let it cool.
  6. Once it is completely cooled keep this in refrigerator. The next day we can shape them as needed. This can be stored in refrigerator for a week. Yummy dessert is ready.


Related Posts Plugin for WordPress, Blogger...