Thursday, November 29, 2018

Danish Aebleskivers- to celebrate 8 years as a food blogger.....


This month my blog turns 8, and I am so happy and glad that I started this blog through which I came to know many of you. I never thought that this space, which I started to share my own passions will go this long. This blog has become a key part of my life where I share all my joys, sorrows, nostalgic memories. Through this blog, I have met some incredible people, both online and offline, I have tasted the most amazing food from all over the world. Thanks to all of you for showing your love and support to my small space.


To celebrate this occasion, I thought of making the popular Danish snack called Aebleskivers, which I first ate when we visited Solvang, a beautiful Danish village near Los Angeles. While we were walking through the streets of Solvang, I read about these fluffy, donut hole type goodies, which are very popular Denmark snacks, that are made during the Christmas season. As I took a bite of these little cute delicacies, I decided that these should be posted in my blog. I thought, it is very difficult to make these aebleskivers, but when I googled upon some recipes, I came to know that these are like pancakes, but light and fluffy like a popover. As my blog is turning 8 this month, I prepared these aebleskivers which were an instant hit.


Aebleskivers are cooked on the stove top, in a special pan with several indentations. Traditional aebleskiver pans are made of cast iron. In Kerala, we have a snack called "unniappam", which is made in a special pan. I made these aebleskivers in that pan and they turned out round and perfect. They are cooked with bits of apple or applesauce inside, but now they are rarely included. As these are not so sweet, these aebleskivers are served dipped in strawberry/  blackberry/  grape or raspberry jams and sprinkled with powdered sugar.


These aebleskivers are very healthy as they don't require oil or butter. I added just a drop of butter in the pan and they came out without sticking. With the ingredients given below, we can make almost around 21 of them. To prepare the batter and making the aebleskivers will take around 30 minutes which will be liked by all if served with jam.
Solvang

This is how they serve the aebleskivers 


Ingredients:
All Purpose Flour- 1 1/4 Cups
Baking Powder- 2 Tsp
Sugar- 3 tbsp
Milk- 1 Cup
Egg- 1 no
Cardamom Powder- 1 Tsp
Butter- 2 tbsp
Powdered Sugar- just to sprinkle on top
Method:
Beat the milk and egg to blend well along with butter.
Add the all-purpose flour, sugar, cardamom powder, and baking powder into the wet ingredients and beat well with a hand blender.
Heat an aebleskiver pan/ unniappam pan to a medium-low heat. Brush little butter and pour a spoon full of batter. Let this cook for about a minute and flip using a wooden skewer. Remove onto a kitchen towel when done and repeat with the remaining batter and serve hot along with jam and sprinkle with powdered sugar.


Wednesday, November 14, 2018

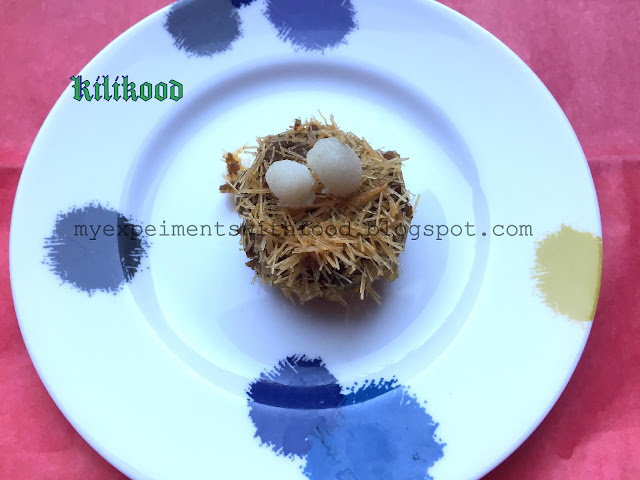
Kilikood/ Birds Nest


Kilikood/ Birds nest is a classic traditional Malabar snack which is very popular and is liked by all. The shape of this kilikood makes it very unique from other snacks. 
A perfect blend of meat, potatoes, and spices, that are shaped and indented, which is later dipped in egg batter and pressed with roasted vermicelli to get the exact shape of birds nest. This requires a lot of patience and time. This is made on special occasions in Kerala.


This is my first attempt and it came out pretty well. I made this for a food fest here in the US, where a bunch of people was organizing a Kerala food fest for the Kerala flood relief. I want to contribute and so myself and my friend decided to make these birds nest, which was a super hit. For the food fest, lots of Malabar dishes were made by different members, which were sold out within minutes.


This birds nest is very different from other Kerala snacks is because of its unique shape. This is also called as Semiya cutlet. My family is big-time fans of this snack. Here we have to use thin vermicelli as the thick ones won't be good. I have made two eggs using rice flour just for the decorations. If making it for home, just omit the rice flour eggs. Hope you all will like and try this out.
Ingredients:

  1. Mutton (minced)- 1.5 lbs
  2. Red Chilli Powder- 1 tbsp
  3. Turmeric Powder- 1 tsp
  4. Garam Masala Powder- 1/2 tbsp
  5. Ginger- Garlic Paste- 1 tbsp
  6. Salt- as required

For the Masala:

  1. Onions- 2 nos
  2. Green Chillis- 3 nos
  3. Ginger- Garlic Paste- 1tbsp
  4. Red Chili powder- 1 tbsp
  5. Turmeric Powder- 1 Tsp
  6. Coriander Powder- 1 tbsp
  7. Cumin Powder- 1/2 tbsp
  8. Garam Masala Powder- 1 tbsp
  9. Boiled Potatoes- 2 nos
  10. Salt- as required
  11. Egg- 2 nos
  12. Roasted Vermicelli- 2 Cups
  13. Oil- for frying

Method:

  1. Pressure cook the mutton along with all the spices till done.
  2. Heat oil in a pan, saute the chopped onions, green chilies till translucent. Add the ginger-garlic paste and fry till the raw smell disappears.
  3. Add all the spice powders, mix well. Add the cooked spiced mutton. Stir till everything gets well blended. Switch off the flame. Adjust the salt accordingly.
  4. When the masala cools down, add the boiled mashed potatoes. Mix well. Make small round shaped balls and press in the middle, shape it like a birds nest. You can make almost 20- 25 cutlets.
  5. Prepare the egg batter by beating the eggs along with salt. Arrange the roasted vermicelli in another bowl.
  6. Heat oil for shallow frying the bird's nest.
  7. Dip each cutlet in the egg batter and then coat it with roasted vermicelli, drop them in hot oil ( keep the oil on low flame)and fry till done on both the sides. Repeat with all the bird's nest and drain on a kitchen towel. Enjoy them along with tomato sauce or just like that.

For decorating:

  • Prepare the rice flour like the pathiri dough . Add cumin seeds in the dough. Make small round balls and place them on the bird's nest. It will look like a birds nest with eggs.


Wednesday, October 24, 2018

Easy Garlic Bread Sticks


This easy, simple homemade garlic bread contains tons of garlic, herbs and is perfectly toasted. This is a delightful, mouthwatering garlic bread recipe that I cannot stop making.
Whenever I feel like making a snack, I will think of something healthy. I will prefer a baked one instead of fried. These breadsticks are a perfect evening snack for the kids. As my daughter's after swimming snack, mostly I will give her favorite snacks to munch but sometimes I experiment with new things and this is one of the experiments which turned out to be a huge hit.


These breadsticks are so tasty, crunchy and crispy even after two days. This is so easy to make, that if we have bread slices and garlic we can make a mouthwatering after school snack which the kids will definitely enjoy.


 Just take some slices of bread, smear garlic- herb infused oil on the slices and bake till done. You can add fresh herbs like the rosemary or parsley. Just chop them and sprinkle on top before baking. Instead of oil, you can also use melted butter. I didn't add cheese, as without adding cheese, these tasted yum. I hope you like this recipe as much as we do.


Ingredients:

  1. Bread Slices- 4- 5
  2. Garlic Cloves- 4 no
  3. Dried Basil- 1 tbsp
  4. Red Chili Flakes- 1/2 tbsp
  5. Oregano- 1 tbsp
  6. Garlic powder- 1/2 tbsp (optional)
  7. salt- as required
  8. Parmesan Cheese- 2 tbsp (optional)
  9. Olive Oil- 2 tbsp

Method:

  1. Preheat the oven for about 350 degrees F.
  2. Meanwhile take the basil, oregano, salt, red chili flakes, garlic powder in a mortar. Pound them well.
  3. Peel the garlic and crush the garlic along with the herbs and olive oil. Crush well till everything gets well mixed.
  4. Take the bread slices, smear the above-made garlic paste evenly on the slices. Cut the slices into desired lengths and arrange them on a baking tray.
  5. Bake these garlic oils infused bread for about 10- 12 minutes or slightly golden brown on the edges. When done enjoy warm breadsticks along with your favorite dip.
  6. If you want to add cheese, sprinkle it on top as soon as the breadsticks are out of the oven.


Thursday, October 18, 2018

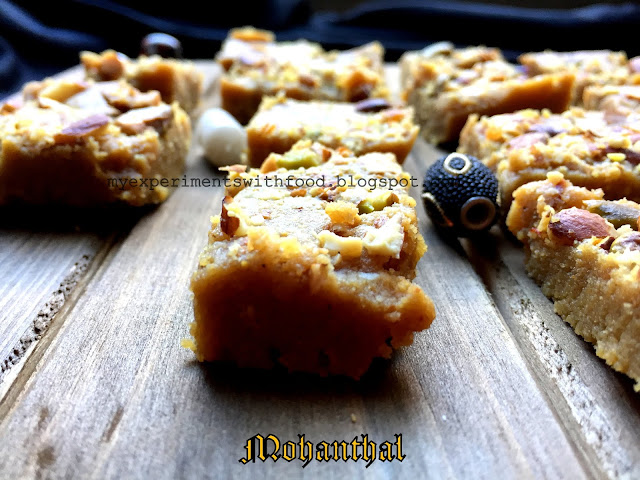
Mohanthal / Gram Flour Fudge


Mohanthal is a very popular Indian sweet which is a part and parcel of the festive season. This is a traditional Gujarati sweet with rich flavor and melt in mouth texture.


The ghee fried gram flour is later mixed with sugar syrup and served in desired shapes. A perfect sweet which will be liked by all and can be prepared for any occasion. It can be prepared within less time if the sugar syrup and the frying of gram flour are done at the same time. The addition of cardamom powder and saffron strands gives an enticing aroma.


I was planning to make this mohanthal from so long, but the usage of ghee and sugar made me back off. But as my kids were asking for some dessert I thought of making this by compromising sugar and ghee. By reducing the sugar and ghee this tasted awesome. Hope you will like this. Try this out and let me know.


Ingredients:

  1. Chickpea Flour- 2 Cups
  2. Milk- 2 tbsp
  3. Sugar- 1/2 Cup
  4. Water- 1/2 Cup
  5. Saffron- a pinch
  6. Clarified Butter/ Ghee- 1/4 Cup
  7. Cardamom Powder- 1 Tsp
  8. Mixed Nuts- 1/4 Cup

Method:

  1. Grease a rectangular glass dish with oil.
  2. Take the flour in a bowl and add the milk and 2 tbsps of ghee. Mix well-using hands, keep this aside for about 10 minutes. After 10 minutes, sieve and keep it aside.
  3. Make sugar syrup by adding sugar, saffron strands, and water on a medium flame. Stir in between. The consistency should be of 2 thread. Switch off the flame.
  4. Meanwhile, heat a pan and add the sieved chickpea flour, cardamom powder, and remaining ghee. Mix on low flame, till the raw smell disappears and nice aroma of the flour emanates.
  5. Take off the roasted chickpea flour from the stove, add the sugar syrup into the ghee roasted flour. Mix well and pour this mixture into greased rectangular glass pan. Spread evenly and with the back of a spoon level. Sprinkle the nuts and press them on top and let it cool at room temperature.
  6. Once when it cools down, cut into square pieces or desired shapes and enjoy.


Thursday, October 11, 2018

Pasta Soup


Pasta soup is a quick twist on a classic chicken noodle soup which is fully loaded with veggies and chicken. Recently when my friend made this delicious, healthy and nutritious noodle soup, I remembered the delicious soup which I had in Banglore.
Julinned Veggies


I ended up making this dish with pasta instead of noodles. A perfect dish to be enjoyed on a cold winter day. This soup is filled with tons of veggies which are cooked along with required amount of water, spices, sauce of your choice in which the boiled pasta is added and when done, enjoyed warm.
The soup can be made in advance and frozen. When needed thaw the soup and add the cooked pasta and serve. We can add any choice of veggies. This will be liked by kids as well as adults. A perfect party hit. Try this out and let me know...


Ingredients:

  1. Pasta- 2 Cups
  2. Carrots- 2 nos
  3. Beans- a handful
  4. Cabbage- 1 Cup
  5. Ginger- 2 tbsp
  6. Garlic- 2 tbsp
  7. Onions- 1no
  8. Chili Flakes- 1/2 tbsp
  9. Garlic Powder- 1 Tsp
  10. Basil- 1 tbsp
  11. Oregano- 1 tbsp
  12. Paprika Powder- 1 Tsp
  13. Turmeric Powder- 1 Tsp
  14. Garam Masala Powder- 1 Tsp
  15. Red Chili Sauce- 1 tbsp
  16. Soy Sauce- 1 tbsp
  17. Salt- as required
  18. Baked Chicken- 1 Cup (See the notes) ( OPTIONAL)
  19. Spring Onions- for garnish

Method:

  1. Bring a large pot of water to boil on high heat and salt it generously. Cook the pasta until al dente. Drain and keep this aside.
  2. Julienne the vegetables along with ginger and garlic.
  3. Heat oil in a pan, add the garlic, ginger. Saute for a minute. Add the sliced onion, saute for a minute and add all the veggies. Give them a nice stir on a medium heat.
  4. Add the all the spices, chili flakes, garlic powder, Basil, oregano, paprika powder, turmeric powder, garam masala. Mix well.
  5. Add around 4 cups of water and let it simmer for 10 minutes on a low flame. Add the red chili sauce, soy sauce along with cooked pasta. Give it a nice stir and switch off the flame.
  6. Ladle the pasta into bowls. On top add the baked chicken and chopped spring onions. Enjoy a nice, hot soup on a winter day.


Baked Chicken:

  1. Boneless Chicken- 2 Cups
  2. Red Chili Powder- 1tbsp
  3. Pepper Powder- 1 tbsp
  4. Salt- as required
  5. Turmeric Powder- 1tsp
  6. Oil- 1 tbsp

Method:

  1. Mix all the ingredients in a bowl and rub this ingredient onto the chicken.
  2. Meanwhile, preheat the oven to 350 degrees F. Place the marinated chicken on a greased baking tray and bake for about 5- 20 minutes or till cooked.


Wednesday, October 3, 2018

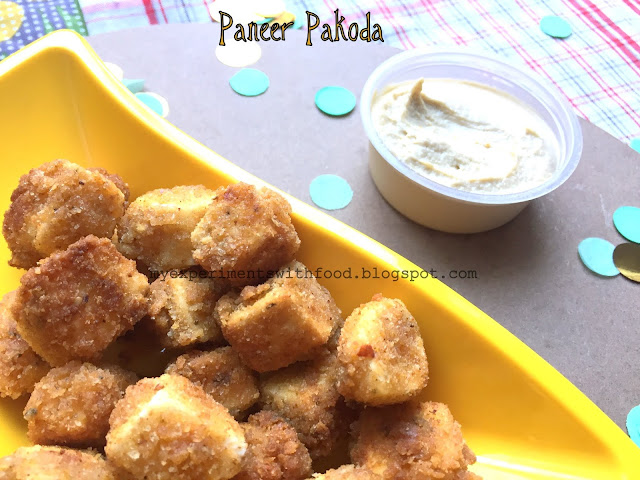
Paneer Pop Corns


Paneer popcorn is a snack which can be enjoyed by everyone. A very healthy after-school snack for kids. This can make a perfect party appetizer which will be liked by all. This has a crunchy outside and a soft inside with which this becomes an excellent relish. These will remain crispy even after an hour of making this. This can be made ahead and refrigerated. When required, fry them in hot oil.


The cubed paneer pieces are dipped in batter, rolled in herbed breadcrumbs and then deep fried. You can increase the spice levels according to your taste buds.
For vegetarians, this is a tasty alternative to chicken popcorns. My daughter likes to eat it after her swimming class. A lip-smacking dish will be ready within no time and with very fewer ingredients. Hope you all will try this out and let me know.


Ingredients:

  1. Paneer (cubed)- 1 Cup
  2. Corn Flour- 1/4 Cup
  3. All Purpose Flour- 3 tbsp
  4. Ginger- Garlic Paste- 1 tbsp
  5. Red Chilli Powder- 1 Tsp
  6. Salt- as required
  7. Turmeric Powder- 1/4 Tsp
  8. Bread Crumbs- 1/4 Cup
  9. Italian Seasoning- 1 tbsp (optional)
  10. Salt- a pinch
  11. Oil- for frying

Method:

  1. Mix the cornflour, all-purpose flour, red chili powder, ginger- garlic paste, turmeric powder, salt along with little water to a thick batter.
  2. Mix the bread crumbs, Italian seasoning, and salt in a pan, keep this aside.
  3. Meanwhile, heat the oil in a deep bottomed pan.
  4. Dip the cubed paneer pieces in the thick batter then roll them in the herbed breadcrumbs and fry them in the medium hot oil till it turns crunchy and golden color.
  5. Drain the paneer popcorns on to a kitchen towel. Serve them hot along with your favorite choice of sauce.


Monday, September 24, 2018

Chukku Kaapi/ Dry Ginger Coffee


Chukku Kaapi is also called as herbal coffee, which is a herbal medicinal decoction and a great home remedy for a sore throat, cold, cough and mild fever. This magical drink is hot, spicy, sweet, strong and very aromatic. Whenever I make this coffee, the whole house will be filled with the aroma. My mom used to make this often whenever we fell sick.


This time around when I made the herbal coffee, there was something new that I got to experiment which turns out to be the first of its kind in my blog. Here I am, introducing to you, the beautiful copper mugs sent to me all the way from Canada. Thanks a bunch to Jessica (www.moscowmuled.com) for sending these over to me. You can check their page to know more about these mugs.


I was so excited to see those mugs and it almost never crossed my mind before that we could use these copper mugs in other types of beverages other than the actual "Moscow Mule". While I am on this topic, I have to mention that there are traditional claims about the health benefits of using copper utensils. There are different schools of thought supporting this claim and otherwise.


However, a general concern about copper utensils is the possibility of copper toxicity. But the makers of this particular brand of Moscow Mule mugs have done a good job of thinking through this and these beautiful mugs are made with stainless steel lining in the inside of these mugs.

The herbal coffee which I made today was my first beverage in these copper mugs.

Ingredients:

  1. Dry Ginger Powder- 1tbsp
  2. Ginger (grated)- 1 tbsp
  3. Coffee Powder- 1 tbsp
  4. Jaggery Powder- 2 tbsp
  5. Whole Pepper- 2 tbsp
  6. Water- 2 Cups 

Method:

  1. Boil the water. Meanwhile, crush the whole peppercorns along with ginger.
  2. Add the jaggery in the boiling water. When it starts melting add the ginger powder and the crushed ginger and pepper. Let it boil.
  3. Add the coffee after a minute and switch of the flame. Inhale the steam coming from the coffee, it will enhance your senses.
  4. Sip the hot coffee slowly by enjoying the aroma.


Related Posts Plugin for WordPress, Blogger...