Showing posts with label Sweet. Show all posts

Saturday, January 15, 2022

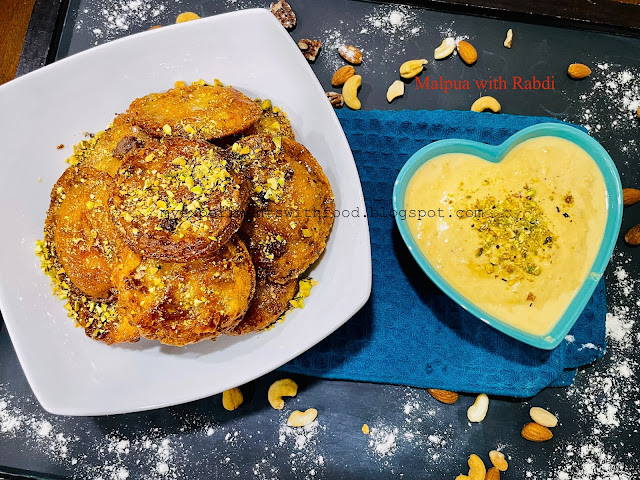
Malpua with Rabdi- a deadly Combination!!!

Malpua with Rabdi is an deadly combination and ones you eat them you will never forget the taste and crave for more. This is a traditional, rich dessert that is made during festivals in India. 

Recently my friend was talking about it and I remembered how we used to go to a restaurant called "Mast Kalandar" in Banglore to eat Thali and at last they used to serve "malpua with rabdi". That's the first time I ate and instantly fell in love with the flavors. From then on we used to go to that restaurant just to eat this dessert.
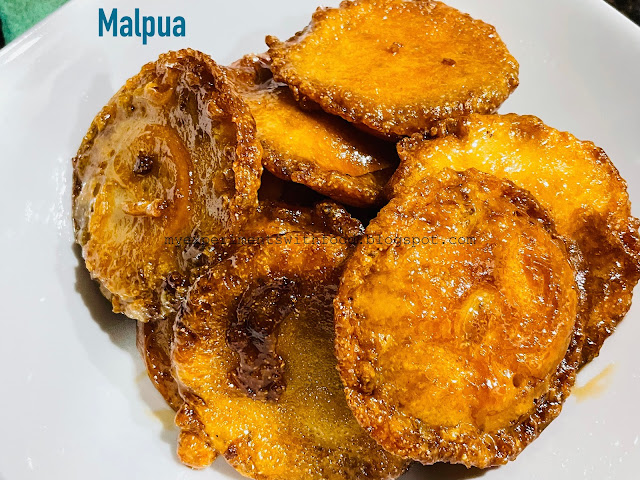
Malpuas dipped in sugar syrup

In US, it's very difficult to get this sweet delicacy as it is available only during special occasions. The thought of making malpua with rabdi came to me long back and so here it is today in my blog post. I am so happy that I tried making this dessert as I thought it's impossible to make this amazing combination of rabdi and malpua. 

Here in the recipe I have used milk- mava powder instead of that we can use khoya too. Milk- mava powder is perfect to make Indian sweets. We can use whole wheat flour to make the malpuas but I want the authentic taste and so I made it using flour.


Soft and fluffy inside and crispy outside. These sugar dipped pancakes are a real treat. Hope you all will try this delicious finger licking dessert.

Sugar Syrup:

Ingredients:

  1. Sugar Syrup:
  2. Sugar- 2 Cups
  3. Water- 1 cup
  4. Cardamom Powder- 1 tsp

Method:

  1. Heat water along with sugar and cardamom powder. Stir well and let it reduce till one string consistency. Switch off the flame and keep this aside.

Malpua:

  1. All Purpose Flour- 1 Cup
  2. Semolina- 1/2 Cup
  3. Milk-mava Powder- 1/4 Cup
  4. Fennel Seeds- 2 tsp
  5. salt- a pinch
  6. Baking Powder- 1tsp
  7. Milk- 2 Cups
  8. Oil- for deep frying

Method:

  1. Mix all the ingredients with required amount of milk in a mixing bowl. the batter should not be too thick or thin. It must be free flowing. Keep this aside
  2. Meanwhile heat oil in a deep pan. On medium flame, pour a ladle full of the batter into the hot oil. Make 3- 4 malpuas in the oil depending upon the pan size. Ones the sides become light brown, flip it and fry till done. Take out the malpuas and dip in the above made sugar syrup and keep it in a bowl.

Rabdi:

Ingredients:

  1. Whole Milk- 8 Cups (1/2 Gallon)
  2. Saffron- a pinch
  3. Sugar- 2 tbsp

Method:

  1. Reduce the milk by boiling on low flame till it reaches a slight thick consistency. 
  2. Stir in between and add the saffron and sugar, mix till it dissolves.
  3. Ones the color of the milk turns light yellow and when it becomes thick switch of the flame and keep this aside.

Arranging:

  • Arrange all of the malpuas in a bowl, sprinkle pista powder and drizzle the rabdi (reduced milk) on top and enjoy hot and yummy malpuas.


Wednesday, September 1, 2021

Instant Crispy Jalebi


Jalebi is a popular Indian dessert which makes an appearance in almost all the festivals and marriages. The best combination that goes well along with hot jalebis are rabdi. These jalebis can be made with different ingredients and they all have variety of names like the paneer Jalebi, Khoya Jalebi, Jaggery Jalebi, jaleba which is king size, jhangri which is made using urad dal, imarti and so on. 

I love all the varieties. In my blog, long back I have posted a jalebi recipe which is made instantly using yeast, today I tried using curd and baking soda. The consistency of the batter matters, as it shouldn't be too thick nor thin.

The thought of making jalebis came to me when yesterday my son after coming back from school saw the jalebi on youtube and started asking me to buy or to make as Jalebi being his second favorite dessert (first one is always Gulab jamun). Today after my morning walk, I gave it a try by preparing the batter and as the jalebis were done, it took only 30- 45 minutes. Using these quantity I made 20-25 Jalebis. As the shape and taste were delicious, I thought of sharing with all my friends here in my blog. Hope you all will try and let me know.


Ingredients:

  1. All Purpose Flour- 1 Cup
  2. Corn Flour- 2 tbsp
  3. Ghee-4 tsp
  4. Curd- 4 tbsp
  5. Baking Soda- 1 tsp
  6. Salt- a pinch
  7. Yellow/ Orange Food Color- a drop
  8. Water- required to make a batter- 1/2 Cup
  9. Oil- for deep frying

Sugar Syrup:

  1. Sugar- 1 Cup
  2. Water- 1/2 Cup
  3. Lemon Juice- 1 tbsp
  4. cardamom Powder- 1 tsp

Method:

  1. Mix the all purpose flour, corn flour, curd, ghee, baking soda, food color and salt in a mixing bowl. Combine these using little amount of water by using a whisk. The batter should be neither thick nor thin, it should be free flowing. If it feels thin add a tbsp of all purpose flour, if it is too thick add small amount of water.
  2. Pour this batter into a squeezer or in a zip lock bag and seal it.
  3. Heat oil for deep frying, when it is hot cut a small end of the zip lock and pour the batter in the shape of Spirals. Make 4-5 rings and let it become crisp on both the sides. Repeat with the remaining batter.
  4. Meanwhile make the sugar syrup by adding the ingredients in a deep bowl on a low heat. Mix and boil till the sugar syrup forms 1 string consistency. Keep this aside.
  5. Add the made jalebi rings into warm sugar syrup, flip it on both the sides for a min and remove. Continue with the remaining.
  6. Enjoy hot jalebis.


Friday, November 27, 2020

Simple Apple Pie- For Thanksgiving and to celebrate 10 years of blogging!!!!!


First of all a BIGGG THANK YOU to each and everyone of you for showing so much love, support and encouragement. Thank you for everything. It's been 10 years since i started blogging. I couldn't believe that the blog space which I started on a Tuesday morning would finish 10 years, which wouldn't be possible without any of you. And also a best way of celebrating my blog's birthday is on a thanksgiving and making an apple pie!!!!!

Apple pie is a dish which I never tried before. I wanted to make this but thinking about the work involving making the filling, then the crust was a big job for me. But once I started making the pie, it was done very quickly. Now I have the confidence of making pecan pie, pumpkin pie and many other pies.

This is the recipe which I made for our thanksgiving dinner along with our friends. This is the first time we are doing the thanksgiving dinner, me and my friend shared the work of making the dishes. My friend made the turkey and boiled veggies whereas I made the mashed potatoes, boiled corn and apple pie. I was little hesitant to make the apple pie, but surprisingly it came out well.

In this recipe I cooked the apple filling, there are some recipes in which it is not required. We can just keep the filling mixed for an hour and it will release the juices. Just add this on the crust and bake.

This recipe has become a favorite and am going to bake this again tomorrow. The crust can be made in advance and can be refrigerated, the same with the filling. Hope you all will try this and if you do please let me know.


Ingredients:

For the Crust:

  1. All Purpose flour- 2 3/4 Cups
  2. Salt- a pinch
  3. Butter- 1 Cup
  4. Cold Water- 3 Tbsp

For the Filling:

  1. Apple (peeled, cored and sliced)- 4Cups
  2. Sugar- 1/4 Cup
  3. Cinnamon Powder- 1 tsp
  4. Nutmeg powder- 1 tsp
  5. Butter- 1tbsp

For Egg wash:

  • Egg- 1
  • Milk- 2 tbsp

Method for egg wash: Mix the egg and milk and keep it ready.

Method:

For the crust:

  1. Place the all purpose flour and cubed butter in the food processor and  Pulse for a couple of seconds. 
  2. Then slowly add the cold water and pulse until the dough barely begins to hold. The dough will be ready when you pinch the crumbly dough together with your fingers. Be cautious with the amount of water you add, too much of water and the dough will be tough.
  3. Empty the crumbly mixture on a clean and dry surface. Use your hands and knead until it forms a dough ball. Wrap it in cling film and store it in the refrigerator till the filling is done.

For the filling:

  1. Add the apple slices, sugar, cinnamon powder, nutmeg powder in a pan and mix well. Place it on a stove with medium flame. Stir well and mix till all the water gets absorbed. At last add the butter and mix well and keep this aside.
  2. Take the pie crust from the fridge and let it rest for 10 minutes to soften the dough.
  3. Roll the dough using rolling pin on a slightly floured surface. while rolling make sure that the dough is not sticking to the surface, add some flour if necessary.
  4. Place this carefully in a greased baking pan and cut around the excess of the dough using a kitchen scissors. Place the apple filling and spread evenly now for the pie to cover roll out the excess dough and cut into long strips and lattice the top. Trim the edges and brush the top using egg wash. 
  5. Bake the apple pie for about an hour and the top should be lightly brown in color. If the top is browning too quickly, cover the top using an aluminum foil. this will slow the browning.
  6. When the pie is done, let it cool and cut into slices and enjoy along with ice cream.


Sunday, August 2, 2020

Chocolate Lava Cake- Easy Peasy....


Avery easy, simple, delicious, fudgy and a gooey recipe with just 6 ingredients and baked in a very less time is what is required to celebrate any occasion. This chocolate lava cakes are enjoyed by every chocolate lover with the desired toppings. These chocolate lava cakes made in ramekins are perfect for single servings. A perfect chocolate lava cake is the one with gooey in the middle.


I made these in ramekin bowls, you can also use muffin tray if you don't have ramekin bowls. This is made within 25 minutes. These cakes are easier than you think. These became famous because they are cakey on the outside with an irresistible center of dark warm chocolate flowing. This will be a super hit among guests and no need of spending too much time for preparation.


Ingredients:

  1. Chocolate Chips- 6 ounce
  2. Unsalted Butter- 1/2 cup
  3. All purpose Flour- 1/4 Cup
  4. Sugar- 1/2 Cup
  5. Eggs- 2 nos
  6. Egg Yolk- 1 no

Method:
Preheat the oven to 350 degrees F.
Spray the ramekins with oil and dust with cocoa powder. Preheat the oven to 350 degrees F.
Place the butter and chocolate chips together on a double boiler and let it melt. Mix well until smooth consistency. Set aside.
Whisk the eggs and egg yolk until combined. Add the flour and sugar in the bowl along with egg mixture. Stir everything together using a spatula without any lumps.
Spoon the batter in the ramekin bowls. Bake for about 12 minutes. The side appear firm and the top will look soft.
Allow to cool for a minute and invert on a pan and enjoy the steaming hot lave cake along with icecream.


Monday, June 22, 2020

Baked Qatayef!!!


Qatayef is a middle eastern dessert. These are yeasted pancakes stuffed with nuts or cheese filling then doused in a thick sugar syrup. They can be soft or crunchy, open or closed, sweet or savory a snack with lots and lots of options. The center can be filled not only with cheese or nuts but also with nutella. This qatayefs are ridiculously crunchy,  bursting with sticky, syrupy sweetness with every bite.


 I tasted these delicacies from a friend who is from Palestine. During Ramadan, she gave some of these uncooked qatayefs for iftar along with a bowl of sugar syrup and told me the method of either deep frying or baking then to dip them in sugar syrup and enjoy for iftar. I baked some and some I deep fried for the kids. They were so crispy and crunchy. We liked it a lot. My kids were finishing them quickly, It was so delicious. My friend told me that this is made during Ramadan times and this is one of the delicious desserts which will be loved by all and so it is.. Please try this out and let me know.


Ingredients:
For the Sugar Syrup:

  1. Sugar- 1 cups
  2. water 1 cup
  3. Lemon juice- 1 tbsp
Method:

  1. In a medium pan combine together the sugar, water and squeeze of lemon juice. Set it on high heat.
  2. Bring to a rolling boil and reduce the flame to medium. Let it simmer for 10 minutes. The syrup will thicken slightly.
  3. Switch off the flame and keep this aside to cool.

For the Pancakes:

  1. All Purpose Flour- 2 Cups
  2. Sugar- 1 tbsp
  3. Milk- 2 tbsp
  4. Baking soda- 1tsp
  5. Yeast- 1 tbsp
  6. Water- 3 Cups

Method:

  1. Mix all the ingredients for the pancake using a hand mixer till everything gets mixed well and forms a loose, pourable batter.
  2. Leave the batter for 10- 20 minutes to bubble up.
  3. Heat a non stick griddle, using a small ladle or an ice cream scoop drop about 2 tbsp of the batter over the skillet. the pancake should be about 3 inches in diameter.
  4. Allow to cook the pancakes slowly without flipping (you can see many bubbles forming) and when they are cooked keep it aside and continue with the remaining batter till all the batter gets over and keep the pancakes separate without sticking to each other and cover them with a damp towel while making the rest of the pancakes. Let them cool completely before filling.

For the Filling:

  1. Ricotta Cheese- 1 Cup
  2. Granulated Sugar- 2 tbsp
  3. Coarse ground Pistachios- 1/2 Cup

Method:

  • Mix all the ingredients for the filling in a bowl and keep it aside.

For assembling:

  1. Take the pancakes with the bubbly side up fill with the cheese and nut filling and close the pancake into half without tearing. Squeeze and pinch the outer edge tightly using your fingers to seal.
  2. You can either freeze them for about a month for later use or heat a skillet with oil and deep fry them to golden brown and crisp.
  3. Here I have deep fried half of them in oil and the other half I baked till done.
  4. Dip these hot fried/ baked qatayef into the prepared sugar syrup and enjoy a crispy crunchy snack.


Sunday, October 27, 2019

Coconut- Jaggery Bars- A Festive Delicacy...


Festive season, everyone is busy cleaning their houses, bringing new furniture, making sweets, gifts, meeting family and friends. Festivals serve to unite people in celebrations and understanding. In India, food is associated with many festivals and Diwali is Festival of lights, fun, frolics and feasts.


As I spent my childhood in Andhra Pradesh, I remember my neighbors and friends sending the homemade festive delicacies, which we all enjoyed. Popular sweets like laddoos, halwas, jilebi, mysore pak and so on. Most importantly gujjiyas.


Festival is the time which reminds me of wanting to make something sweet and here I am today with one of my favorite, which my mom makes in the form of laddoos. This recipe, I saw in a blog which sounded like exactly the bars which I get from Bangalore, Nilgiri's supermarket. They are so firm and delicious. I am so excited that the bars turned out to be exactly like them.


Mix all the ingredients listed below in a low flame and within seconds a mouthwatering delicacy will be ready to eat. Just make sure, you don't burn the coconut while cooking it along with jaggery. In my house, everybody likes this. You can make ahead and pack and gift them to your family or friends. This will be a perfect Diwali sweet to make as it won't take much time and can be made ahead and stored.


Today, I am posting this delicious recipe of coconut- jaggery bars, which I am sure that everybody will like it. It is so delicious and yummy that you won't stop eating once you start.

Ingredients:

  1. Desiccated Coconut- 2 Cups
  2. Jagger Powder- 2 Cups
  3. Milk- 4 Cups
  4. Ghee- 3 tbsp
  5. Cardamom Powder- 1 tsp

Method:

  1. Combine the coconut and jaggery in a non stick pan and mix them using a wooden spatula on a low flame till it gets combined. 
  2. Pour the milk and stir well gradually add the ghee and cardamom powder. Mix well till everything gets mixed well.
  3. When it starts to leave the sides, switch off the flame. Grease a steel pan with some butter and pour this mixture into that. let it cool and keep refrigerated for 4-5 hours or overnight.
  4. Cut into desired shape and enjoy with your friends.


Monday, August 19, 2019

Key Lime Pie- Back to School time!!!!!


It's back to school time!!!!  Here I am today with a delicious mouth watering recipe of lime Pie. My daughter who is a big fan of limes and lemon always asks for a key lime pie whenever we go to eat out. For the summer vacations, she was asking me to make one and the time went by doing a lot of things other than this Lime Pie.


On the first day of school, I want to surprise her and so I made this easy, simple pie which can be done within no time. The best key lime pie ever. A bit tart, a bit sweet and an incredibly easy dish which will be your family's favorite.


The buttery graham cracker crumbs is beautifully baked into a crust and filled to the brim with an incredibly creamy filling of a combination of yolks, condensed milk, lime juice and lime zest, that is so quick to make.


A perfect balance of tart and sweet will make this pie an incredible dessert to serve for any occasion. The only hard work involved in making this dish is to squeeze the lime but that's worth. The store bought lime juice, will make the pie loose it's authenticity. Hope you all might like this. Please try this recipe and let me know how it turned out.


Ingredients:
For the base:

  1. Graham Crackers- 14 nos
  2. Sugar- 1/3 Cup
  3. Butter(melted)- 1/2 Cup
  4. For the Filling:
  5. Egg Yolks- 4 nos
  6. Condensed Milk- 14 Oz
  7. Lime Juice- 1/2 Cup
  8. Lime Zest- 2 lemons
  9. Lemon Slices- to garnish

Method:

  1. Pre heat the oven to 350 degrees F.
  2. Crush the graham crackers in a food processor along with sugar and butter. Process for 2- 3 minutes till everything gets well blended.
  3. Mix with hand and press the crumb mixture into a greased 8"- 9" spring form pan. Bake for about 8- 10 minutes and let it rest to cool.
  4. Meanwhile whisk together egg yolks, condensed milk, lime juice, lime zest in a medium bowl.
  5. Pour this into the cooled graham cracker crust and bake for another 10- 15 minutes. 
  6. Let the pie cool and chill for 30 minutes. Serve and enjoy a delicious gooey lime pie.

For garnish:

  • You can decorate with lemon slices (that's what I did). We can also decorate using whip cream and enjoy.


Related Posts Plugin for WordPress, Blogger...